Friday, 10 December 2010
Why a Knife Edge: 10.12.10
A knifes edge or color filter. You need something to partially block or color the light at the focal point. I made some color patterns and had slides made from them and that seems to have the best effect. For a knifes edge, a razor blade will work. A razor is needed because if there is any thickness it will scatter the light and produce flaring.
Schlieren Photography: 10.12.10

Schlieren photography is a visual process that is used to photograph the flow of fluids of varying density. Invented by the German physicist August Toepler in 1864 to study supersonic motion, it is widely used in aeronautical engineering to photograph the flow of air around objects. Its role is changing due to the increasing use of computational fluid dynamics, where the same principle is used to display the computed results as flow images.
http://en.wikipedia.org/wiki/Schlieren_photography
Shadowgraph: 10.12.10

Shadowgraph is an optical method that reveals non-uniformities in transparent media like air, water, or glass. It is related to, but simpler than, the schlieren and schlieren photography methods that perform a similar function. Shadowgraph is a type of flow visualisation.
In principle, we cannot directly see a difference in temperature, a different gas, or a shock wave in the transparent air. However, all these disturbances refract light rays, so they can cast shadows. The plume of hot air rising from a fire, for example, can be seen by way of its shadow cast upon a nearby surface by the uniform sunlight.
http://en.wikipedia.org/wiki/Shadowgraph
More Schlieren: 10.12.10
Schlieren photography is a visual process that is used to photograph the flow of fluids of varying density
There are several methods commonly used to visualize refractive index or density changes in liquids, gases, liquids and solids.
Generically these include shadowgraphs, schlieren and interferometric techniques. These sytems are used to visualize temperature gradients, shock waves in wind tunnels, nonhomogeneous areas in sheet glass, convection patterns in liquids, etc.
The focusing schlieren method:


http://people.rit.edu/andpph/text-schlieren-focus.html
Desert Effect: 10.12.10

A mirage is a naturally occurring optical phenomenon in which light rays are bent to produce a displaced image of distant objects or the sky. The word comes to English via the French mirage, from the Latin mirare, meaning "to look at, to wonder at". This is the same root as for "mirror" and "to admire". Also, it has its roots in the Arabic mirage.
In contrast to a hallucination, a mirage is a real optical phenomenon which can be captured on camera, since light rays actually are refracted to form the false image at the observer's location. What the image appears to represent, however, is determined by the interpretive faculties of the human mind. For example, inferior images on land are very easily mistaken for the reflections from a small body of water.
Camera Obscura: 10.12.10
The camera obscura (Latin; "camera" is a "vaulted chamber/room" + "obscura" means "dark"= "darkened chamber/room") is an optical device that projects an image of its surroundings on a screen. It is used in drawing and for entertainment, and was one of the inventions that led to photography. The device consists of a box or room with a hole in one side. Light from an external scene passes through the hole and strikes a surface inside where it is reproduced, upside-down, but with colour and perspective preserved. The image can be projected onto paper, and can then be traced to produce a highly accurate representation.
Using mirrors, as in the 18th century overhead version (illustrated in the Discovery and Origins section below), it is possible to project a right-side-up image. Another more portable type is a box with an angled mirror projecting onto tracing paper placed on the glass top, the image being upright as viewed from the back.
As a pinhole is made smaller, the image gets sharper, but the projected image becomes dimmer. With too small a pinhole the sharpness again becomes worse due to diffraction. Some practical camera obscuras use a lens rather than a pinhole because it allows a larger aperture, giving a usable brightness while maintaining focus.

http://en.wikipedia.org/wiki/Camera_obscura
Torch: 09.12.10

The torch has been ordered via the internet by Immo
Lumapower Mentor MT-E Torch with 500 Lumens and one central LED Bulb
http://www.torchdirect.co.uk/lumapower-torches/lumapower-mentor-mt-e-torch.html
Thursday, 9 December 2010
Parabolic Mirror: 09.12.10
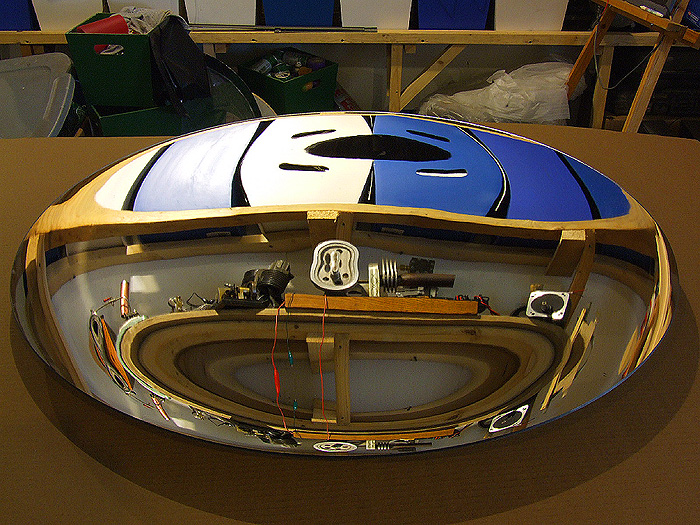
http://www.greenpowerscience.com/PARABOLICSHOP/25PARABOLICSALE.html
SIZE-----------------25"H X25"W
* POWER EST.-----------8.0
* BEAM-----------------SPOT
* BEAM SIZE MAX POWER--1 INCH (additional scatter"4)adds background heat
* FOCAL LENGTH---------21 INCHES FROM OUTER RIM - 23 INCHES FROM CENTER BASE
* WEIGHT --------------3 LBS.
* MAX TEMP. CLIMB------1251 F IR THERMOMETER
* MAX COLLECTION-------1607F
* MATERIALS TESTED
* WATER------------12oz. BOILS 120 sec.
* WOOD-------------FLAME .2 SEC.
Research: 09.12.10
LED Laser Torch
Parabolic mirror focal length
Camera obscura
Further schlieren photography techniques
- Why the razor blade
Installation layout
Structure for the mirror
Dessert effect
Parabolic mirror focal length
Camera obscura
Further schlieren photography techniques
- Why the razor blade
Installation layout
Structure for the mirror
Dessert effect
Class Meeting: 08.12.10
We experimented until we had utilised all of the new equipment we had brought in and still we need to do further reaserch and buy more equipment, including an LED laser torch, a structure to house the mirror and to find out the focal length of the mirror from the supplier.


Whilst experimenting down in our newly assigned room in the basement in the TC building Ray came across an old photography enlarger that we might be able to utilise in our installation in a way of a structure to house all of the components.


The images above are some of which we took on Wednesday during our experiments. The images show the light source reflection from the mirror onto a piece of white card. Although theses images don't show the results we saw with our eyes, we did actually see some sort of results. Whether they were Schilren effect or not we still have more experiments to action. We saw what looked like a dessert effect, heat patterns / waves come out from the lighter and also the soldering iron.

Sunday, 5 December 2010
Assignment Two Thoughts: 05.12.10
Presentation: part one:
A 'hands on' demonstration of your virtual world
Presentation Part two:
justify the context and design
Submission:
Justification - max 500 words
Supporting Studies:
Concept/Idea/Realisation/Design (visualisations/sketches/images)
- Concept
- 3D Visualisations of exhibition istallation
Contextualise with an audience in mind (Kinetika)
- Contextualise
Technical research/tests requirements (pictures/films etc!)
- Technical requirements for exhibit
Time scopes/costs/Health & Safety/project management
Experiments
Research / References / Artist relations
Blog / Diary:
- Blog
Exhibition / Installation Documentation:
- Images from exhibition
- Feedback from exhibition
- Critical analyse of Exhibition and art work
All into a bound document
Sallys Thoughts: 05.12.10
- 'Flow visualisation' is really what we are trying to accomplish with our work and Schlieren is only 'one' (& presently our chosen) method that can be used to visualise this.
- for me it is the realisation of these hidden attributes of nature and natural phenomena that exist all around us, and the 'unseen' physics and mathematical wonders of nature that I find very interesting (truly amazing really!!)
- the unpredictable!! (or are they? many patterns in nature may exist as a result of calculable known formulae and principals of physics)
- patterns created in swirling smoke or the way air and water create unseen furls and vortex's in the route it takes as it 'migrates' or 'infuses' with another substance, or progresses on it's natural and eternal journey, or just in the movement of a breath, or a gentle motion or gesture, that although it is taken for granted by all of us
- it is this hidden complexity in an apparent simplicity or 'nothingness' (i.e air, water, atmosphere etc.),
- which is how 'all' life is supported and sustained. Our existence throughout time is based on the ability of the constant interchange of substance and matter
- as the intricate and complex process of the oxygenation of our blood which is then distributed throughout our bodies via our heart, to our vital organs which occurs without us even being conscious of it.
All of this is so much more incredible than is realised.
These apparently simple, yet incomprehensibly complex occurrences are potentially breathtakingly beautiful and I hope that we can capture and convey the immense hidden importance that belies the enigma of the forces of life itself.
Please do not lose sight of this as to me it is the essence of our work.
- this link from the has some amazing and inspiring flow visualisation images.
- Perhaphs we should consider the use of stills and/or film in conjunction with our installation as a medium to convey our message.
http://www.colorado.edu/MCEN/flowvis/index.html
By the way - the film on Youtube is very good but please also look at the 'Galleries' tab for a wider range of stills and footage.
Assignment Two: 05.12.10
Type: Justification and demonstration of virtual reality artifact.
Weighting: 70%
Timing: 15 mins
1. Modelling files used in *.m? format - where appropriate
2. Unity/Flash/Quartz Composer/ Other composition file
3. Hard copy of justification - max 500 words.
Weighting: 70%
Timing: 15 mins
1. Modelling files used in *.m? format - where appropriate
2. Unity/Flash/Quartz Composer/ Other composition file
3. Hard copy of justification - max 500 words.
Assignment One Feed Back: 05.12.10
Group feeback:
The group presentation was rather well structured and organised as a whole, however there was so significant overlap and redundant sections between the individual contributions.
Despite the relatively clear technical background, it was felt that the proposed project lacked some artistic depth. The proposed meaning and aim of the work wasn't clear at all, and there seemed to be some confusion over the (working) title.
Individual feedback:
The presentation consisted in a poorly structured and uncontextualised list of references in the form of art works or practitioners. Although each of them was rather clearly presented, seemed relevant and related to a common theme, the connections between them were not made obvious and there was no real critical analysis and identification of a specific research stream.
The paper is not structured beyond the list of reference material, mirroring the subject matter of the presentation.
The technical diagrams of the proposed installation often don't communicate properly: they need simplification and better labelling. They should conform more closely to agreed conventions of technical drawing.
Presentation remarks: No student number is present on the paper that has been submitted. The paper isn't bound.
Mark: 50
Tutors: Olivier Ruellet & Andrew Moller
Comments on Feedback:
I do feel this is a far overall mark as the time we have had to develop this idea has been lacking. The group has taken longer than expected to come together and decide on a final idea which is still decidedly ropey! Hopefully over the next month this 'idea' will flourish into a justifiable piece of artwork ideal for Kinetica.
LED Laser Research: 05.12.10
Ideally our light source would need something that has an LED with a laser like quality as one bulb, that can be plugged into a power supply preferable the mains.

210 Lumen Aluminium Torch £49.99, This maybe the perfect starting point for our experiments as its not to powerful but should give greater results than with the V9 Micro laser pen and its a little cheaper.
http://www.maplin.co.uk/Module.aspx?ModuleNo=503167

750 Lumen CREE Torch £69.99, This looks like it will be really powerful with 750 Lumen, maybe too powerful!
http://www.maplin.co.uk/Module.aspx?ModuleNo=503166

LED Lenser V9 Micro Laser Torch £9.99, This is what we have used for our earlier experiments. The results were there but not bright enough.
http://www.maplin.co.uk/Module.aspx?ModuleNo=97720
Subscribe to:
Posts (Atom)